
This is a documentation of how I manage my WordPress websites using Git, GitHub and Local (by Flywheel / WP Engine). I am not claiming that this is the best way for everyone. But this works beautifully for me.
Tools I use:
- Amazon AWS server with Git installed. (Git documentation)
- Putty to connect to the server.
- GitHub.com account.
- Local
- GitHub desktop
- Git for desktop (only needed for submodules).
This is what my workflow looks like:
- Fire up Local and start the website.
- Work on the website and make any changes like plugin updates or WordPress updates.
- Once all the changes are ready and any tests are complete, commit it using GitHub desktop to GitHub.com. Usually a private repository hosts the website code including plugins, themes and WordPress core.
- Connect to AWS using Putty. Pull updated content from GitHub.com using
git pull origin master --rebase. - Visit the website backend so that any database updates can happen.
Installing Git and linking GitHub.com
Your webserver might already have Git installed. You can check by typing in git –version. If Git is not present, follow the instructions here.
Creating Git repository on the server
I like to create the Git repository just above the WordPress root directory. This will make sure that domain.com/.git is not accessible publicly.
- So /var/www/html has a folder named domain.com.
- Once the repository is initiated /var/www/html/domain.com contains the .git folder and a folder that contains all WordPress files.
- /var/www/html/domain.com/wordpress/ contains all WordPress files including wp-config.php.
- On the server, the vhost file points to /var/www/html/domain.com/wordpress/ as the root folder.
Setting up .gitignore
It’s important to add the .gitignore file before the first commit (to avoid a lot of pain, trust me). This file resides in the /var/www/html/domain.com folder.
This is what .gitignore typically looks like for me:
# WordPress upload and upgrade folders are not version controlled
/wordpress/wp-content/uploads
/wordpress/wp-content/upgrade

# I prefer to not version wp-config.php.
# This allows me to have a separate wp-config.php on my local.
/wordpress/wp-config.php

# This is where the scheduled database backups reside.
# I have a different process to export a copy of the database elsewhere.
/wordpress/wp-content/backup-db/*.gz

# Other excluded files
/.htaccess
*.sql
*.DS_Store
*Thumbs.db
*.sass-cache*
*~imageoptim*
Create empty repository on GitHub.com
I usually create a private repository. This means that Git will ask for authentication when pushing to the repository. (You can create a personal access token if you prefer to use that instead of your password)
Copy the web url of the repository. You will get this by clicking the “Download” button
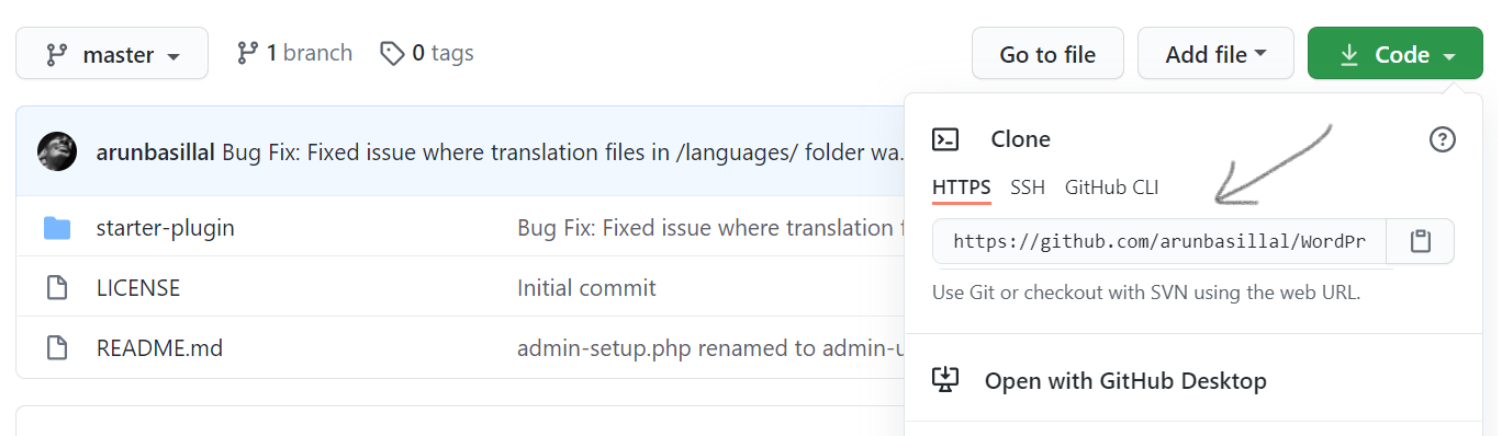
It will look like: https://github.com/your-username/name-of-repository.git
Creating repository on the server
With .gitignore created, I will proceed with creating a Git repository. I will browse to /var/www/html/domain.com folder and run the following commands (reference):
- git init
- git add .
- git commit -m ‘First commit’
- git remote add origin https://github.com/your-username/name-of-repository.git (replace this of course)
- git pull origin master –rebase
- git push -u origin master
Setting up local working environment on Local
Now we have a Git repository on the server which is synced with GitHub.com. Next step is to create a repository on the laptop so that development can happen on the local machine.
- Add a website in Local. Make sure the domain is what you want (dev.domain.local for example).
- After Local completes it’s install, delete all WordPress files in \app\public\. Keep a copy of wp-config.php.
- Using GitHub desktop, checkout the repository into \app\public\. (The .git folder will be created here.)
- Use WordPress in a folder logic (without URL change) and configure .htaccess in \app\public\.
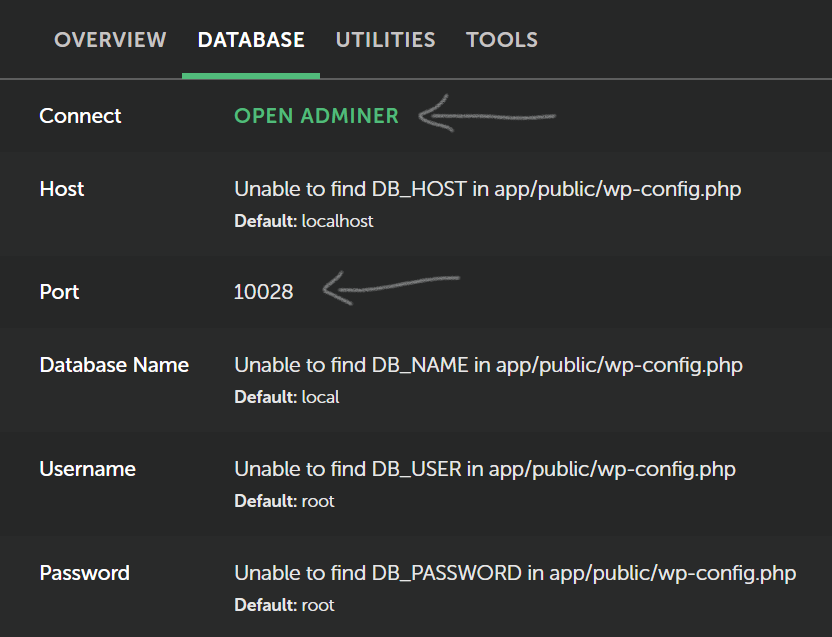
- Add wp-config.php from your server manually. Then update DB_NAME, DB_NAME, DB_PASSWORD and DB_HOST. (Usual values for Local are local, root, root, localhost respectively. Refer the wp-config.php that was kept in step 2 for the values.)
- Ignore Local only files with \app\public\.git\info\exclude file. (Usually I have to add local-phpinfo.php in it. Local creates this file in the \app\public\ folder. )
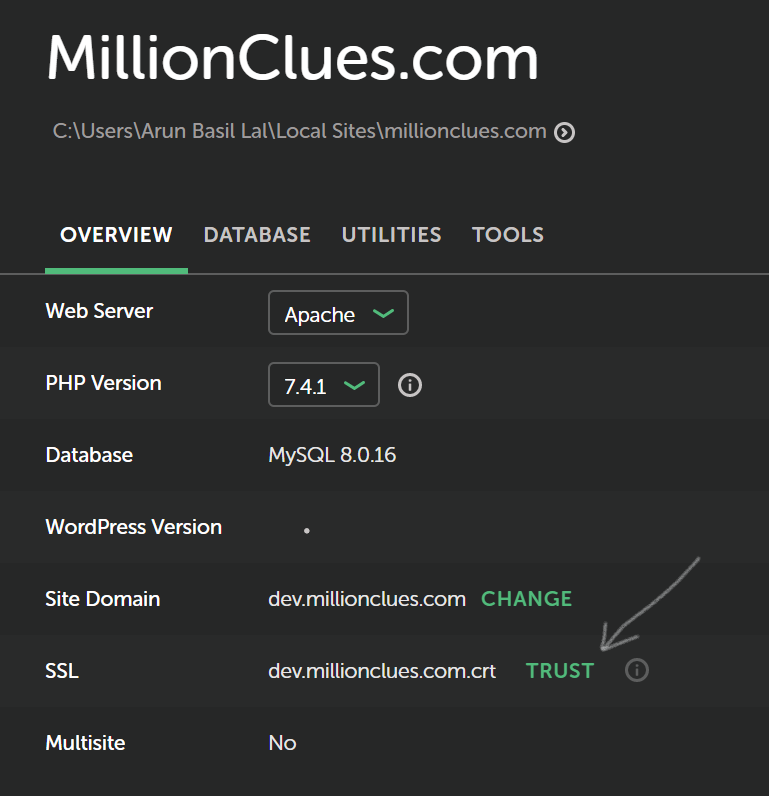
- Trust certificate for the website from Local. This step is optional.
- Import website database to Local database. Local provides Adminer in the Database tab to make this easy.
- Search and replace links to production website with Local website in the database. (i.e. replace domain.com with dev.domain.local in our example). I use this awesome tool for the job. (Port for mysql can be noted from the Database tab in Local.)
Using Git Submodules to add other repositories within your website
Often I manage plugins or themes as independent git repositories. These sub-repositories could be added to the website as Git Submodules.
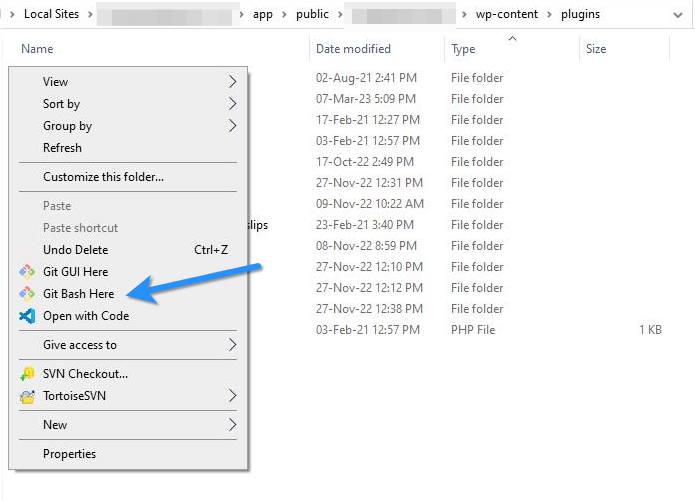
To make this easy, I have Git installed on my PC. I will document an example where I add a plugin as a submodule.
- Go to /wp-content/plugins/ folder in Windows explorer, right click and choose Git Bash Here. (refer screenshot below)
- Type in git submodule add https://github.com/arunbasillal/plugin-repository.
- This will create a folder named plugin-repository in the plugins folder and checkout the files into the folder.
- You will see the submodule added when you check the website repository it GitHub desktop. Commit the changes and push them to GitHub.com.
- Now open the website in AWS navigate to the folder with the Git repository and pull the changes using git pull origin master –rebase.
- Then pull the files using git submodule update –init –recursive.
If you have followed this far, I hope you have a working setup. Now follow the workflow I mentioned at the start of the article.
Let me know if you have questions or suggestions. Good luck to you!
I am a WordPress product developer and creator of Image Attributes Pro. I am passionate about solving problems and travelling the world.


Leave a Reply