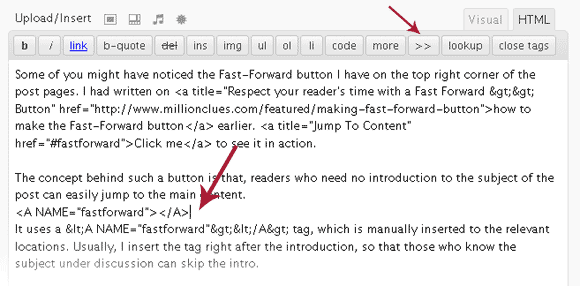
Some of you might have noticed the Fast-Forward button I have on the top right corner of the post pages. I had written on how to make the Fast-Forward button earlier. Click me to see it in action.
 The concept behind such a button is that, readers who need no introduction to the subject of the post can easily jump to the main content.
It uses a <A NAME=”fastforward”></A> tag, which is manually inserted to the relevant locations. Usually, I insert the tag right after the introduction, so that those who know the subject under discussion can skip the intro.
I used to keep the code in a txt file and copy them into each post. Not anymore! I created a Quicktag which lets me insert it into posts on the click of a button and here is how I did that. You can use it to create your own Custom Quick Tags.
Creating a Custom Quicktag for Fast-Forward Button
We are editing a WordPress Core file here again. Always start your edits after creating a backup of the file.
Quicktags are defined in the file Quicktags.js in the wp-includes\js folder. Download the file and create a backup.
The code for the Fast-Forward Quicktag is:
[sourcecode language=’css’]
edButtons[edButtons.length] =
new edButton(‘ed_ff’
,’>>’
,’‘
,”
,’t’
,-1
);
[/sourcecode]
From lines 36 to 133, you will find the codes for other pre-defined Quicktags as well, add the above code somewhere in between them. The position of the button on the post editor (HTML view) will depend on where you insert the above code.

Custom Quicktags @ Work
I, inserted the code from lines 135, see where the button is located. You can edit the ‘>>’ on the third line of the above code to anything else, that’s what the button would read when it comes up in the post editor.
The function for Quicktags is defined is well documented in the file, (see lines 9 to 16), read that or this guide and you can define custom quick tags for all your needs. No more copy-pasting!
Update: In WordPress 2.8, the quicktags.js is compressed and is not easily readable. There is a second file named quicktags.dev.js which is the uncompressed version. Rename quicktags.dev.js to quicktags.js (first you will have to rename the compressed quicktags.js). Then add the custom quicktag code.


You don’t have to insert an extra anchor tag – just give the id ‘fastforward’ for the header tag – that will work in all modern browsers.
I was using that one earlier, but while switching to WYSIWYG editor after adding the code, WordPress automatically removes the tag. But the name tag (as I use now) is not removed. So when I go back to edit old posts, I dont have to add the code again, so I prefer this way 🙂
Thanks for the tips via email 🙂
Great Tip Friend. I used it in my local WordPress installation.
Thats great, I guess you are using the wamp server, Its an awesome tool. 🙂
Good to know that someone is using it, I dont think many adopted it yet.. Thanks mate. 🙂
Nice tip.
Cheers man, Thats really supportive…
Thanks for dropping by, You are welcome 🙂
Nice work up there. Heck hands down.
I am overwhelmed, Thanks for the words, really matters 🙂